Followers

COMING SOON!


Showing posts with label tutorial. Show all posts

2/11/13

'Bubblegum' tutorial!

Hey everyone.
I've had a few people ask me about doing a tutorial for the 'Bubblegum' look,
so I obliged!
In case you didn't see the post,
this look used all unnamed pinks from a Sephora palette,
plus 'Raspberry' from BFTE.


1. On a primed lid, sweep the lightest pink of the pink trio on the inner corners outwards, using a flat shadow brush.**You'll notice a lot of fallout with the Sephora shadows,
but that will be taken care of at the end :)


2. Using a fluffy brush, sweep the lightest pastel pink from pt. 2 of the palette on brow bone.


3. Using the shadow brush again, apply the matte pink to rest of lid.
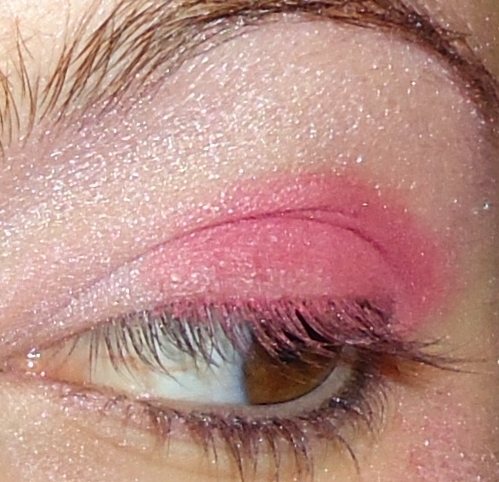


4. Using a thin liner brush, apply the darkest pink to the crease.


5. Using a different fluffy brush, blend 'Raspberry' over the crease.


6. Using a short, square, thin brush, apply shadows under waterline the same order as one lid, lightest to darkest. Also, finish blending together everything up top so it looks fluid.


7. Apply eyeliner & mascara. Also, dab a bit of foundation on a makeup sponge & swipe under both eyes with it, picking up any fallout.


Tada!

What do you guys think?
I haven't done many tutorials before,
so was this one helpful?
Let me know! :)

7/21/12

'Crazy Easter' eye tutorial! (pic heavy)

Happy Saturday!
So some of the feedback from my giveaway that I got was that severallll of you asked for makeup tutorials.
I asked you guys to vote on which look you wanted me do to,
and the 'Crazy Easter' look won.
So here we go!


Step 1. 
Apply an eyeshadow primer. I don't always use then when I use prestige cosmetics (like Urban Decay) b/c their staying power is already AWESOME, but it's a good safe measure.

Step 2.
With a fat, round brush that came with the palette,
I applied 'metallic' yellow from ULTA's metallic palette. I swipe from the corner outward, usually 2 or 3 'coats' for opacity.

Step 3.
I applied the next shade in my rainbow of colors- UD's 'Graffiti'. I chose to do it with my finger because there's not as much fallout and I also find it easier to manipulate applying it on a small area as opposed to a makeup brush. Weird?

Step 4.
I continue my layers of colors using UD's 'Peace'. Again, I applied with my finer (though a different finger this time). I overlap each layer just SLIGHTLY with the color in front of it, blending a bit as I go- but not too much. I save really blending well until the end, for some reason...

Step 5.
I apply my final color, UD's 'Junkshow' on the outer corner of my eye. No matter what color I use, I almost always apply in this area with my pinky. The rounded top is just the perfect size to apply the color. I have my finger positioned like so, and sweep outward.

Step 6.
(sorry for the crappy pic)
Here I used my UD Crease brush to apply UD's 'Ransom' on my brow bone.


Step 7.
Here I've applied the same colors on my lower lash line with a Shadow brush,
and applied eyeliner along my waterline.

Step 8.
Lastly, I apply my liquid eyeliner along the top of my upper lashes and winged it out slightly.
I also finally applied my mascara. 
I really feel like these last two steps REALLLY help open up my eyes :)

Final Product:

:)

I hope you guys found this helpful and liked it!
Please give me any feedback you think of so I know what I need to continue/improve upon!
Have a great night!


7/6/12

Lime Crime's Uniliner Eyeliner review

Helloooooo!
So glad it's friday,
though it means by short hiatus from school is over :/

Anyway,
some of your feedback also mentioned you wanted to see reviews.
Since it's been awhile since i'd done one,
(and being that I just got these eyeliners in the mail this week),
I figured now would be a perfect time to do one!

So here we have Lime Crime's eyeliners!

First, you'll notice the awesome packaging. This goes for ANY Lime Crime product. Their theme is so mystical and fantastical- i love it!

Though I wanted to buy the entire collection,
I could only afford two at the moment:
'Lunar Sea'

'Blue Milk'

First off, i WILL say they are much smaller than I thought they would be, but I really don't think it's going to matter.
Each of these liquid liners are beautiful and unique.
They are milky and opaque with one 'coat', sometimes it takes two.
They're so versatile- i can't wait to create some looks with them.

'Blue Milk' and 'Lunar Sea'

The only downside is that they're not very forgiving, and for people who have shaky hands (like me), this can make them very difficult to work with. But practice makes perfect :)
Still, I prefer liquid eyeliners over pencil anyday. I find that they really just mesh with my eye looks better.

LC has many other colors for sale that I hope to add to my collection soon.
You can get these and others on their website for $13.99 a piece!


Also,
don't forget to vote for the eye tutorial of your choice,
and
:)


7/5/12

YOU pick the tutorial! (pic heavy)

Hey ya'llllll !
Hope everyone is having a great week,
and recuperating (if necessary) from yesterday ;p

I've gotten some really great feedback lately through my giveaway.
Many of you have mentioned that you'd like to see tutorials for some of my eye looks,
so I figured i'd do my best to oblige :)

That being said, for my first tutorial,
i'd like it to be over something that YOU guys WANT to see.
SO, i'm going to need your help!
I need you guys to look over the looks on this post & tell me which you would most like to see a tutorial for.
I've complied ones that either were my favorite or most popular among you guys.
Whichever look gets the most 'votes', wins!
(the following are in no particular order)

1. Spring

2. Fire

3. 'The Hulk' (deemed so by one of my lovely followers!)

4. Valentine's Day 
(sorry for the horrible pic quality; some of these are pretty old!)

5. Dainty Easter

6. Lilac

7. 'cool' colors

8. Biopolar 'Dream Tree' looks

9. Crazy Easter

10. 'In Search of Saveopatomas'

11. ombre

12. Trafalgar True


Thanks for the help guys!
:)